Well, I tried =/

Tuesday, June 30, 2009
,Joy the Baker, one of my favorite blogs, is the place I can turn to when I want to to find the perfect recipe, even when I don't know I'm looking for it. So on one visit to her delectable site I stumbled upon a recipe for Strawberry Coffee Cake. It seemed like a simple and cute recipe with plenty of mouth watering pictures to entice the baker within me. Although I put off making it for sometime, I finally came across a perfect storm of a day. I had the house to myself and no plans for hours. I always know that although the recipe may say it has a 20 min. prep time and 50 min. cook time, that means at least 2- 2 1/2 hrs. for me=D. That's pretty much what happened with this recipe. But it was okay because I had already devoted the day to baking.

Sherry's Strawberry Coffee Cake (Upside down)

Joy's Strawberry Coffee Cake


So... the picture of my coffee cake isn't as enticing as Joy's, oh well. A lot about this recipe didn't turn out the way I'd hoped or anticipated. First off, I should have most definitely doubled the amount of strawberries I used. Even though it says to use a cup sliced, I would pretty much just go strawberry crazy. As long as you love strawberries (I mean, if your making a strawberry cake I would hope you do), don't be afraid to put a lot in, it can only help.
Joy's strawberry filling

Sherry's strawberry filling


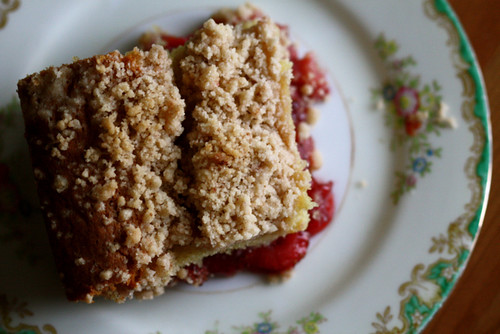
Yeah, that's definitely not enough ^^. Also, one of my favorite things about coffee cake is that good ole streusel topping. Unfortunately for me, it didn't come out so great. So here's my thought: I think I should bake it halfway, then add the streusel topping. You see in my case, the filling rose up and over the topping and created a flat cake top, as you can see below.
The streusel poked out here and there but that's really not what I'm looking for. Also, when I went to make the layers of batter then strawberries then batter, they ended mixing a bit, which shouldn't have happened.=(


So here's the recipe. I thought the instructions were very good and easy to understand. I was pretty proud of myself for going the extra mile and actually sifting my dry ingredients instead of just tossing them around with a fork. I hope you have better luck with it than I did. In the end, it did taste okay. I mean, it was like your average coffee cake, but I didn't get that great strawberry flavor I was hoping for (probably due to my lack of the sufficient amount of strawberries).

Strawberry Coffee Cake
from Joy the Baker

1 heaping cup sliced strawberries

1/3 cup sugar

2 Tablespoons cornstarch

2 teaspoons water

1/2 cup butter, softened

1 cup sugar

2 eggs

2 cups all-purpose flour

1 teaspoon baking powder

1 teaspoon baking soda

1/2 teaspoon salt

8 ounces sour cream

1 teaspoon vanilla extract

a few drops of almond extract (optional)

Topping:

3 Tablespoons cold unsalted butter, cut into 1/2-inch cubes

1/2 cup all-purpose flour

3 1/2 tablespoons sugar

Preheat oven to 350 degrees F.

To make the topping:

Combine all the topping ingredients in a bowl and rub together with your fingertips until crumbly. Set aside.

To make the strawberry mixture:

Combine strawberries, 1/3 cup sugar, water and cornstarch in a small saucepan. Cook over low heat for 5 to 7 minutes, stirring constantly until the sauce is thickened and strawberries are soft and somewhat broken down. Set aside to cool.

Grease and flour a 10×10-inch baking dish, knocking out excess flour, and set aside.

To make the coffee cake:

Cream butter and sugar until light and fluffy, about 3 minutes. Add eggs one at a time, beating well after each addition. Add vanilla extract, and almond extract if you’re using it.

Sift dry ingredients together. Add the dry ingredients to the creamed butter in 3 parts alternating with the sour cream in 2 parts, beginning and ending with the dry ingredients. Beat just until combined.

Spoon 2/3 of the batter into the prepared pan. Spread the cooled strawberry mixture over the batter. Spoon the remaining batter onto the strawberries and spread evenly. Top with streusel topping and bake in the upper third of the oven.

Bake for 50-60 minutes, until a knife inserted into the center of the cake comes out clean.


*side note*: please please please, eat some of the batter before you pour it into the dish. Yes there are raw eggs, but just 2!! It is so light and fluffy like a cloud when you taste it=) It makes you smile.

I should've started earlier...

Thursday, June 25, 2009
Even though this is my first post on my first blog, I already feel like whining. I should have started taking pictures and blogging earlier. At 16 years of age, however, it's easy to see why I probably didn't start a food blog years ago. I've made a lot of dishes and treats in my life and to have been able to post them for others to see would have been really cool! But I only thought of it now. So now I'm going to stop dwelling on the past and instead, look to the future. Or rather, what I made this morning because I was bored. =D

Almond Biscotti (kind of)


So basically I have never in my life eaten a biscotti. But I have longingly stared at them, curious as to what they tasted like. Sure people can describe it to you, but nothing's like that first surprising taste of it when you're like "Oh, yeah that is was they were talking about". Or at least that's how it was for me. So I found this recipe some where... I kind of forget what site... whoops. But after putting it off for awhile I got to it.
So the reason that they're "kind of" almond biscotti is because of two things:
1. We didn't have almond extract in the house.
2. We didn't have almonds in the house.
Wow. Those are pretty much the only things that would constitute these as "almond" biscotti. Well I managed to find a minuscule amount of almond slivers back in our cabinet which helped. Not much though. But I would not be stopped so easily. By using twice the amount of vanilla extract (as I was told by yahoo search engine that this would suffice) and what small amount of almond slivers I had, I was able to make some darn good biscotti!
Okay so since I don't remember where I got this recipe from, I'm just going to hand type the recipe from the white printed out sheet I had it on.

1 stick of butter
3/4 c. sugar
2 large eggs
1/2 tsp. almond extract (or in my case 1 tsp. vanilla extract)
2 c. flour
1 1/2 tsp. baking powder
A generous pinch of salt (whatever that means...)
3/4 c. sliced almonds (or in my case whatever form of almonds of whatever amount that you can find in your house)

Preheat the oven to 325 degrees. In a bowl (they say use a stand mixer, but who can really afford those), cream the butter and sugar until light and fluffy. Beat in the eggs, one at a time. Stir in the almond extract. Or whatever you got.
In a separate bowl, mix together the flour, baking powder, and salt. Slowly mix the dry ingredients into the butter and sugar mixture until fully incorporated. Stir in the sliced almonds. Again, or whatever you got.
Turn the dough onto a floured surface and divide it into thirds. Roll into logs about 2-inches in diameter. Place the logs on a parchment-lined baking sheet and bake for 25-30 minutes, until lightly browned. Remove the logs and allow them to cool slightly.
While the logs are still warm, slice them diagonally about 1/2 inch thick. Use a sharp knife to avoid crumbling. *I cut a few with a serrated blade and quickly became frustrated at the crumbling. Then I switched to my Rachel Ray approved super blade and had much more success.* Arrange the slices on two baking sheets and bake for approximately 7 minutes, until they appear barely toasted. Turn the biscotti over and allow them to toast for another 5-7 minutes, until lightly browned. Cool on a rack!
Makes about 30 biscotti. They will keep for several weeks in the freezer.

Also i don't know if it's just my weird oven or not, but mine kept a fairly light color. Though I've seen other recipes where the biscotti turn pretty browned, I quite prefer them not so done. That's just me though=)


As an added touch I found some white chocolate chips in the cupboard and decided to melt them down. Then, I just spread the goop over about half the biscotti so as to not make it so overwhelming a flavor and detract from the biscotti goodness itself.
*added note: If you decide to add some kind of chocolate or other goopy topping and are also making biscotti on a sweltering hot day in your kitchen without air conditioning, do not leave them in a pile on your counter. They will surely melt onto one another. Promptly place them in your freezer until you're ready for more.

So to finish my first post I would like to reveal something. I had to type this entire post with only the use of 9 of my 10 fingers. Yes, the other day during a baking experiment I was slicing carrots and well, slipped with my knife. It was quite painful. My left hand middle finger is still healing and, but besides having to wear a large band aid, it is okay. The carrot cake cookies I made turned out pretty good as well. Although I think they would have been much better had they been deemed as muffins instead. With a spongy, moist texture throughout the whole "cookie", I think it would have been a wiser choice to have made them as muffins.

Okay. I am now officially ending my first post. Yay!