468x60

Vanilla Celebration Cake

Thursday, June 16, 2011
So can you guess where I'm headed this Fall? PITT.

I made this cake immediately after we returned home from visiting the PITT admissions office. It was such a thrilling and exiting day! We talked to an admissions counselor and I got to learn a lot about the school. And that night, I put in my enrollment deposit. Did you know the deadline to basically pick what college you're going to is May 1st? Yeah, well this decision was made round-abouts April 21nd? Yeah, cutting it pretty close.... But ultimately I feel like PITT is the best choice for me!

My ephiphany came one afternoon (April 16th?) while I was driving around Oakland in dowtown Pittsburgh (where PITT's campus is) with my friend Vinnie. As we were driving I would point out places and streets and name things for him. I'd show him some places I love going to or wish I could go to. Eventually he stopped me and said, "Sherry. Why aren't you going to PITT?" I have an obvious love for Pittsburgh. I can't explain it. The culture, the theater, the arts, the food, the people. It's home. It's not that I'm afraid to leave and be on my own, it's that I'm already where I need to be. Trust me, I'm more than ready to be on my own!
I love the atmosphere of downtown Pittsburgh and I can't wait to be immersed in it everyday=) Sure my parents only live 15 minutes away, but being in town is a completely different world. And, staying close to home will allow me to keep in touch with my cousins, aunts and uncles, and sister, who are all major parts of my life.
Now you may be wondering what I plan to study while I attend PITT. Well, I'll save that for another post;) Now let's talk about cake!

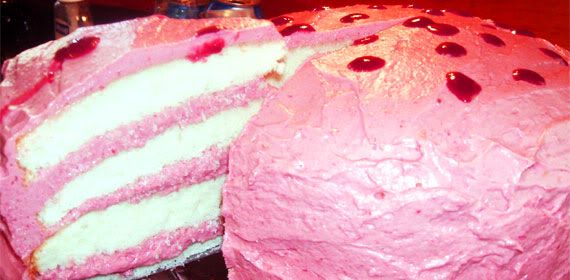
I don't often make celebration cakes. They are big and my family is small. And this cake was BIG. And I probably ate half of it. No lie. It was SOOO good. As you may have noticed, the layers are HUGE. Yeah, that was a surprise to me as well. I put the batter in 2 9-inch round pans, and seriously these things puffed up like crazyyyyy. Now, they may look a little brown on top, but the inside is perfect! I was worried when I saw the tops, but one bite immediately set aside my fears. That said, a longer baking time was needed. The frosting recipe I choice was my go-to vanilla frosting recipe from Martha Stewart. Absolutely perfect. In fact, the frosting just barely covered the sides of the cake and I was worried with how thick the cake was if the frosting would be balanced enough. And guess what? It was perfect!

The cake is a tight crumb and oh so moist. It's going to be my go-to vanilla cake recipe from now on. It is incredibly easy to work with and yeilds amazing results! Use this recipe if your making a vanilla cake for a celebration because you'll certainly please everyone!
Vanilla Cake
Yield: Two 9-inch round, 2-inch tall cake layers, and, in theory, 22 to 24 cupcakes, two 8-inch squares or a 9×13 single-layer cake
4 cups plus 2 tablespoons cake flour (not self-rising)
2 teaspoons  baking powder
1 1/2 teaspoons baking soda
1 teaspoon table salt
2 sticks unsalted butter, softened
2 cups sugar
2 teaspoons pure vanilla extract
4 large eggs, at room temperature
2 cups buttermilk, well-shaken
Preheat oven to 350°F. Butter two 9-inch round cake pans and line with circles of parchment paper, then butter parchment. (Alternately, you can use a cooking spray, either with just butter or butter and flour to speed this process up.)
Sift together flour, baking powder, baking soda, and salt in a medium bowl. In a large mixing bowl, beat butter and sugar in a large bowl with an electric mixer at medium speed until pale and fluffy, then beat in vanilla. Add eggs 1 at a time, beating well and scraping down the bowl after each addition. At low speed, beat in buttermilk until just combined (mixture will look curdled). Add flour mixture in three batches, mixing until each addition is just Incorporated.
Spread batter evenly in cake pan, then rap pan on counter several times to eliminate air bubbles. (I like to drop mine a few times from two inches up, making a great big noisy fuss.) Bake until golden and a wooden pick inserted in center of cake comes out clean, 35 to 40 minutes. Cool in pan on a rack 10 minutes, then run a knife around edge of pan. Invert onto rack and discard parchment, then cool completely, about 1 hour.
 

Fluffy Vanilla Frosting1 1/2 cups (3 sticks) unsalted butter, room temperature
1 pound (4 cups) confectioners' sugar, sifted
1/2 teaspoon pure vanilla extract

Directions
1) With an electric mixer, beat butter on medium-high speed until pale and creamy, about 2 minutes.

2 )Reduce speed to medium. Add the confectioners' sugar, 1/2 cup at a time, beating well after each addition and scraping down sides of bowl as needed; after every two additions, raise speed to high and beat 10 seconds to aerate frosting, then return to medium-high. This process should take about 5 minutes. Frosting will be very pale and fluffy.

3) Add vanilla, and beat until frosting is smooth. If not using immediately, frosting can be refrigerated up to 10 days in an airtight container. Before using, bring to room temperature, and beat on low speed until smooth again, about 5 minutes.

Chocolate Chip Cheesecake Brownies

Friday, June 10, 2011

You remember my last post? Yeah, well these are the Raspberry Swirl Cheesecake Brownie's uglier cousin: Chocolate Chip Cheesecake Brownies. They are as ugly as they are delicious. So pretty delicious=)
These pictures embarass me. They really do. I know a lot of people refuse to put subpar photos on their blog, but obviously I have low standards. Love me anyways? But honestly, I wouldn't have had any pictures to share with you. And who likes a food post with no pictures in it? Exactly: no one.


As I said with the other brownies, I brought these to a bakesale and they were gobbled up in just a few minutes! It was crazyyy. Also, like the last brownies, these were soooooo under baked (I didn't bring the really bad ones to the sale. Those were put in a much better place... my mouth). So definitely watch for doneness when you pull these out.


Chocolate Chip Cheesecake Brownies
Smitten Kitchen
Makes 16 2-inch square, thick brownies
Brownie batter
 1 stick (1/2 cup or 4 ounces) unsalted butter, cut into pieces
 3 ounces unsweetened chocolate, chopped
 1 cup sugar
 2 large eggs
 1/2 teaspoon pure vanilla extract
 2/3 cup all-purpose flour

Cheesecake batter
8 ounces cream cheese, well softened
 1/3 cup sugar
 1 large egg yolk
 1/4 teaspoon pure vanilla extract

Plus
 1/2 cup semisweet chocolate chips (I used minis and it worked fine!)

Make brownie batter: Put oven rack in middle position and preheat oven to 350°F. Butter an 8-inch square baking pan. Microwave chocolate and butter together in a safe dish and mix until they combine. Whisk in sugar, eggs, vanilla, and a pinch of salt until well combined. Whisk in flour until just combined and spread in baking pan.

Make cheesecake batter: Whisk together cheesecake batter ingredients in a small bowl until smooth. Add in chocolate schips. Dollop over brownie batter, then swirl in with a knife or spatula.

Bake brownies: Bake until edges are slightly puffed and center is just set, about 35 minutes. Serve warm or at room temperature.

Slicing tip: Chill the brownies until they’re almost frozen before cutting them. It makes it much easierto get a clean slice.

Raspberry Swirl Cheesecake Brownies

Wednesday, June 8, 2011

Wow. Where have I been? Busy=/ And I just haven't been too inspired to blog. It's probably because of these subpar photos. Usually if I take pretty decent photos I'm more willing to blog. And why not? If I have great pictures I'm much more willing to show it off in a blog post. But taking pictures of my food often frustrates me=( I don't enjoy wasting time setting up a perfect light reflective area to take optimum pictures while my food grows cold.

And these pictures are pretty bad. These bars aren't very well cut and have poor backgrounds. The photos were taken late at night so the lighting is messed up. But I just hope they don't scare you too badly.


Because they are delicious! If you've been reading my blog, you'll know I'm not a big fan of chocolate desserts. Just look through my post history. But, when chocolate is balanced with another flavor, it gets a thumnbs-up. So we have a brownie base then a cheesecake layer SWIRLED WITH RASPBERRY JAM. I brought these in for a bake sale, and they sold in literally 5 minutes. So, even though they don't look so hot in these photos, they were certainly enjoyed by all!


*My only comment: they were super gooey in the middle. Normally I'm all for underbaked goodies, but I would suggest triple checking for doneness when baking these.

Raspberry Cheesecake Brownies
from Baking Bites

 1/2 cup butter, room temperature
 2-oz dark chocolate, chopped
 1 cup sugar
 2 large eggs
 1 tsp vanilla extract
 2/3 cup flour
 2 tbsp cocoa powder
 1/4 tsp salt

 8-oz cream cheese, room temperature
 1/3 cup sugar
 1 large egg
 1/2 tsp vanilla extract
 1/3 cup raspberry preserves/jam
Preheat oven to 350F. Line an 8×8-inch square baking pan with aluminum foil and lightly grease.
 In a small, heatproof bowl, melt butter and chocolate together. Stir with a fork until very smooth. Set aside to cool for a few minutes.

 In a large bowl, whisk together sugar, eggs and vanilla extract. Whisking steadily, pour chocolate mixture into sugar mixture. Stir until smooth. Sift flour, cocoa powder and salt into the bowl and stir until just combined.
 Pour into prepared pan and prepare cheesecake mixture.
 In a medium bowl, beat cream cheese, sugar, egg and vanilla extract until smooth. Drop in dollops onto prepared brownie batter. Drop dollops of raspberry preserves into the cheesecake batter. Gently swirl batters with a butter knife, giving the brownies a swirly look.

 Bake for 35-40 minutes, until brownies and cheesecake are set. A knife inserted into the cheesecake mixture should come out clean and the edges will be lightly browned.
 Cool in the pan completely before slicing and serving, either at room temperature or chilled.
 Brownies can be refrigerated, covered, for several days.

Makes 16 brownies

Cinnamon Chocolate Chip Sour Cream/Cottage Cheese Coffeecake

Monday, May 16, 2011

Yes it is necessary to put sour cream/cottage cheese in the lengthy title because that is the whole reason I made this! I had a bunch of fun baking substitutes in my fridge that I wanted to use up before the went bad. Things like buttermilk, sour cream, and cottage cheese. How fun would it be to substitute theese in a recipe and see how it turns out?

I would love to start tweaking recipes and even creating my own. As a young blogger, I have always followed recipes to a tee and hardly ever stray from the beaten path. But as I'm growing in my skills I want to start getting creative! This was a small small start, but hey it's something!

It was a great texture, and it didn't even contain the signature streusel that coffee cakes usually do. I loved the chocolate chips throughout; they definitely made this cake. Of course I can never leave well enough alone, so I made myself a cinnamon confectioners sugar glaze, but you honestly don't even need it.

Nom Nom!

Cinnamon Chocolate Chip Sour Cream/Cottage Cheese Coffeecake
inspired by The Food Librarian

Cake
1/2 cup unsalted butter at room temperature
1 1/2 cups granulated sugar
3 large eggs, separated
1 1/2 teaspoons vanilla extract
1 cup sour cream
1 cup cottage cheese
3 cups all-purpose flour
1 teaspoon baking powder
1 1/2 teaspoons baking soda
3/4 teaspoon table salt

Filling and Topping
2 cups or 12 ounces semi- or bittersweet chocolate chips
1/2 cup granulated sugar
1 teaspoon cinnamon
Preheat oven to 350°F. Butter a 9-x-13-inch baking pan. If not nonstick coated, cover the bottom with a rectangle of parchment paper. Set pan aside.
In a large bowl, cream butter and 1 1/2 cups sugar. Beat in egg yolks and vanilla. Sift flour, baking soda, baking powder and salt together into a separate bowl. Alternately mix in sour cream and cottage cheese and then dry ingredients into butter mixture until both are used up and the batter is smooth and very thick. In a medium bowl, beat eggs whites until stiff, then fold into batter.
In a small dish, whisk together sugar and cinnamon for filling and topping.
Spread half the cake batter in the bottom of prepared pan. Sprinkle with half of cinnamon-sugar mixture and 1 cup of chocolate chips. Dollop remaining cake batter over filling in spoonfuls. Use a rubber or offset spatula to gently spread it over the filling and smooth the top. Sprinkle batter with remaining cinnamon-sugar and remaining chocolate chips. With the palm of your hand, ever-so-gently press the chocolate chips a bit into the batter. No need to submerge them, you just want to make sure they adhere bit.
Bake for 40 to 50 minutes, rotating halfway through, until a tester inserted into the center of the cake comes out clean.

Baked Spaghetti Dinner

Sunday, May 8, 2011

With school winding down, I haven't been blogging a lot. I read plenty of blogs, but mine seems to get pushed aside. Whoops! I'm caught up with end of the year stuff, and preparing for college next year. Which, I will tell you guys more about later in a special post=)


This dish was easy, though I didn't think some of the instructions were that clear. The good thing is that it is so flexible. So do it how you want=) I didn't use real pesto leaves, but like a squeeze tube bottle my mom bought. I was still very good with this substitution.

I liked eating spaghetti like this. The sauce and meat are distributed nice and it was quite tasty. It was a hit in my family=)

Interesting tidbit, I took these photos with my phone. I think they turned out pretty well. Then again, most of my pictures are pretty mediocre so it doesn't really make that big of a different haha.

Baked Spaghetti Dinner
found at How Sweet It Is

serves 4-6
3/4 pound whole wheat spaghetti
1/2 onion, chopped
3 cloves garlic, minced
1 tablespoon olive oil
1 1/4 pounds ground beef
1 teaspoon salt
1 teaspoon pepper
10-12 fresh basil leaves, chopped
2 cups of your favorite pasta sauce
1 cup shredded mozzarella cheese
1/2 cup freshly grated parmesan cheese


Preheat oven to 350 degrees. Prep water to boil for pasta. I cooked a spaghetti with a 10-minute cooking time for 7 minutes since it was going in the oven.

Heat a skillet on medium heat and add olive oil. Add onions with a sprinkle of salt and pepper and saute until soft, about 5-6 minutes. Add garlic and stir for another minute. Season ground beef with the teaspoon of salt and pepper and add to skillet. Break apart with a wooden spoon and brown on both sides. This should only take about 5-6 minutes.

Stir in one cup of pasta sauce and half of the chopped fresh basil. Mix to combine. Spray a 9×13 baking dish (or baking dish of your choice, I used an 8-inch round, 4-inch deep dish) with non-stick spray. Add half of the spaghetti mixture to the dish, then top with 1/2 cup tomato sauce and half of each cheese. Add the remaining spaghetti and top with the rest of the sauce and cheese. Bake for 20 minutes, or until cheese is golden brown and bubbly.

Apple Cinnamon Baked Granola

Tuesday, May 3, 2011
I just love eating granola with my yogurt in the morning. Straight yogurt just doesn't feel right to me. I love having contrasting textures in my foods, and granola fits the bill perfectly! For my first attempt at making granola, I went to a health food blog I certainly trust to steer me in the right direction! Healthy Food For Living.


I only made three slight changes. Instead of cashews, I used walnuts. Instead of puffed brown rice cereal, I used chex mix. And instead of dried apple pieces, I use real apple chunks! Note: Good idea if you plan on eating this over the first few days. Two weeks later, you will find mold...


Apple Cinnamon Baked Granola
found at Healthy Food For Living

Ingredients:
1 1/2 cups rolled oats
1 1/2 cups puffed brown rice cereal (I used Chex Mix)
6 Tbsp unsweetened applesauce
1/4 cup pure maple syrup
1/2 tsp pure vanilla extract
1 Tbsp ground cinnamon 
1/4 tsp salt
1/2 cup chopped nuts, such as walnuts, pecans, or almonds (I used walnuts)
1 cup chopped dried apple rings (Use real apple chunks with caution as I mentioned before)

Directions:
Preheat oven to 325 degrees F. Line a cookie sheet with parchment paper.
Measure the oats and rice cereal into a large bowl, set aside.
In a medium bowl, whisk together the applesauce, maple syrup, vanilla extract, cinnamon, and salt. Whisk until very smooth.
Pour wet ingredients over cereal and stir until evenly coated. Spread mixture on the prepared cookie sheet in an even layer.
Bake for 15 minutes. Remove sheet from the oven, stir the nuts into the granola, and bake for an additional 10-15 minutes, or until the granola is golden brown and crisp.
Remove granola from the oven, toss with the dried apples, and cool completely. Store in an airtight container.

Pizza on Ciabatta

Thursday, April 28, 2011
I loved everything about this recipe when  I saw it. I stole this from How Sweet It Is, like a lot of the recipes I have tried. But it's the highest form of flattery I believe=)


This pizza was soo good and really easy. I love how flexible the recipe is. You can honestly do anything with it. It's nice that you can skip the dough step of pizza making. And it's definitely a step up from frozen pizza.


I can't wait to try this again, but I'm definitely going to expand on it. New flavors and maybe try a spin on buffalo chicken dip?? I have a major obsession with buffalo chicken dip and I really don't show it enough on this blog.


Pizza on Ciabatta
Idea from How Sweet It Is

Your choice of baguette type bread (I used ciabatta)
Pizza sauce
Shredded cheese
Toppings of your choice

Method: Preheat oven to 350. Slice baguettes in half, lay on baking sheet, and bake in the oven at 350 degrees for 10 minutes so bread can get crispy. Remove bread, add toppings, and place back in the oven for 10 minutes. Broil for 1 minute to get cheese brown and bubbly.