Caramel Cheesecake

Friday, January 28, 2011

This was a special dessert I made especially for my wonderful boyfriend. He loves cheesecake and all things caramel. When I said why not make a caramel cheesecake, he starting basically worshiping me. Apparently he didn't think it was a doable thing to make? Oh well, it make me look like a hero! So I took over his kitchen and made it. He was a fabulous sous chef though=) And, whenever I needed to return home and the cake was still in the
oven, he took direction very well and made it through the multistage cooling process. This so fun for us to do together and I'm sure we'll be baking more together in the future!


I had it for breakfast, for an afternoon snack, and for a bedtime treat. See how versatile this can be???? Also, I used a different crust recipe than provided because he
won't eat nuts. "It's not the flavor, it's the consistency". Ughhhh. I used cinnamon graham crackers for mine which was a subtle yet nice hint.

The cake may have been a tad undercooked, but I like a lot of my baked goods that way. Hehe. I was luscious and creamy and to die for. King Arthur wouldn't steer you wrong, and neither would I!


Caramel Cheesecake
from King Arthur Flour Blog

Ingredients:
Crust
1 cup All-Purpose Flour
3/4 cup pecan meal or ground pecans
3 tablespoons sugar
1/2 teaspoon salt
1/2 teaspoon cinnamon
1/2 cup unsalted butter, softened

Filling
1 1/2 pounds (three 8-ounce packages) cream cheese, at room temperature
1 1/2 cups brown sugar
2 teaspoons vanilla extract
1 /4 teaspoon salt
1/8 teaspoon Pralines and Cream Flavor, optional (I omitted)
4 large eggs
1/2 cup Caramel Sauce
1/2 cup cream or half & half

Directions
1) Preheat the oven to 375°F. Lightly grease a 9" spring form pan.
2) Mix the crust ingredients till crumbly. Press onto the bottom and 1" up the sides of the prepared pan; prick with a fork.
3) Bake the crust for 10 to 15 minutes, till light golden brown. Remove it from the oven; reduce oven temperature to 325°F.
4) Mix the cream cheese, brown sugar, vanilla, salt, and flavor at low speed until smooth, scraping the bottom and sides of the bowl.
5) Add the eggs one at a time, scraping the bowl between additions.
6) Stir in the caramel sauce and cream.
7) Pour the filling into the crust and bake for 40 minutes. Reduce the heat to 300°F and bake 15 minutes more, until the edges of the cake are set, and an instant-read thermometer inserted 2" from the edge reads 170°F.
8) Turn off the oven, crack the door, and let the cake cool in the oven for 1 hour.
9) Remove the cake from the oven, and cool it at room temperature for 1 hour.
10) Refrigerate for 8 hours (or overnight) before serving.

Yield: 12 servings.

Weekly Dinners

Sunday, January 23, 2011
I mentioned in a previous post that I am hoping to start making more regular dinners for my family. It's difficult to do so when I get home from musical practice most days by 5:30, but I do my best. I have kept with it pretty well and I want to share some of the meals I've made. My dinner posts will be brief and probably not that descriptive. It's just important for me to log the meals and then be able to look back on them and see if we enjoyed them or not.


I choose to use legs for this recipe because we rarely have them. My dad doesn't like them (dumbbbb) so I had to force it. But, he said he loved this dish; as did the rest o
f our family. The extra sauce from the chicken is great poured over rice. The ingredients were so simple and I made this in 5 minutes flat. Then it just put in the oven until ready. I'm sure we'll try it again.


This was the first of my structured dinners that I made for my family, and what a way to start off! This was incredible! I have never made homemade mac n' cheese, but the idea was so enticing! It's sad that in today's world most people hear mac n' cheese and think of the blue box. But really, the best stuff is homemade from scratch. Nothing out there beats it. Nothing! Everyone in my family loved it and we are dying to try more homemade macaroni and cheese recipes soon!


I don't think there was anyway to pick a favorite recipe from the week. But I must say, we loved these roasted vegetables. The colors were phenomenal and I couldn't believe how easy it was to make. We definitely want to try this roasting method again and see what creative things we can do with them. I used a french baguette to make buns, but they we
re a little difficult to eat like that so I'd probably pick a different bun for next time.


I have made this recipe before, but I was dying to make it again! I mistakenly used cheddar cheese instead of the monterey jack cheese, which tasted just fine, but I do prefer the monterey jack. The green chiles in the sour cream sauce are subtle, but very necessary. They really tie the dish together I think. Another unanimous favorite in our house.

Not pictured but some things we have also made recently:

Cheesy Broccoli and Rice
-This was very tasty, but I think we though it wasn't cheesy enough and needed a tad more moisture, but I'm pretty sure that can all be blamed on my cooking skills and not the recipe. We are interested in trying it again, though.

Pepperoni Pizza Puffs
-These were a disappointment. We weren't big fans of it because they tasted flavorless. However, we think it was due to the fact that we did not have pizza seasoning like the recipe required, and tried to make up our own. So we aren't exactly sure what went wrong, but I don't think we'll be trying them again anytime soon.

Chipotle Cheddar Meatloaf Muffins
-These were fabulous! They were quick and easy and were a great kicked up version of meatloaf. They kept well and were easily microwaved for lunches or day after dinners. But trust me, they'll be gone fast!


And we also made some home made chicken and dumplings from an often used cookbook in our house: Betty Crocker's Cooking Basics. It's our go-to for Thanksgiving every year. It's so fabulous and such an easy fall back recipe!


This was kind of a different post for me to write, so hopefully you all accept it! My plan is to continue making these regular dinners and then posting a big round up of them so you guys can see. I hope this post inspires you to cook more home meals, or just try some new dinner recipes!

Mountain Dew Cupcakes

Friday, January 21, 2011

First off let me tell you something: I don't drink pop. At all. Well, okay, on Christmas Eve every year I order a Shirley Temple with my dinner at the same Japanese restaurant we go to every year, but that doesn't really count. When I was younger, I was a pop a
ddict. I honestly drank pop and ate pretzels like it was my job. 3-4 cans a day. It was baddddd. Then, my mom finally cracked down on me and my sister when I was around age 12, and I've been pretty clean ever since. Besides the Shirley Temple or pop infused cupcake here and there.


My boyfriend (of 9 months Monday) is a pop addict. More specifically, Mountain Dew. I know he loves pop, he knows I won't drink it, and we understand each other. So, I decided I would surprise him with a special recipe that highlighted the (second) love of his life.

He loves that I bake. In fact, I've invaded his kitchen and baked for him there before which is what went down with these cupcakes and another recipe to come. Though he can't stand pumpkin and won't eat anything with nuts in it (we'll work through it), he really supports
my baking. So to show my appreciation, I wanted to try a recipe that would be all about him.


To recreate this beloved drink, the essence of lemons and limes is essential. My zester is my favorite tool, so it was great to have another chance to use it! The cupcakes baked up beautifully and the icing was a perfect pairing. The true essence of the iconic mountain dew flavors were apparent. He was so thankful for them and I just just happy he liked them. In the middle of winter, it was nice to have an item reminiscent of Spring.


Mountain Dew Cupcakes
from slush

(some of the lemon and lime ingredients can be confusing, so read carefully!)
1 cup butter (2 sticks)
2 cups sugar
4 large eggs
3/4 cup Mountain Dew
1/4 cup of lemon and lime juice (juice from 1 lemon and 1 lime)
zest from 1 lemon and 2 limes (separate into 2 piles, one for buttercream)
1 1/2 teaspoons lemon extract
2-3/4 cups all-purpose flour
1-1/2 teaspoons baking powder
1/4 teaspoon salt

1. Beat butter on medium for 30 seconds.
2. Add sugar and lemon, lime zest. Beat on medium-high until light and fluffy.
3. Add eggs one at a time, Scrape sides of bowl in between additions
4. Whisk together flour, baking powder, and salt in a bowl. Add to mixer bowl. Turn on low for 5 seconds.
5. Add the Mountain Dew, lemon/lime juice, and lemon extract . Mix to combine.
5. Scoop into cupcake papers about two-thirds full.
6. Bake for 18-20 minutes until a cake tester comes out clean.

Mountain Dew Buttercream

1 cup butter (2 sticks)
4-5 cups powdered sugar
2 tablespoons Mountain Dew
Juices from half of 1 lemon and half of 1 lime.
Lemon and lime zest (rest of zest from cupcake recipe. Or zest from half of 1 lemon and 1 whole lime)
1 teaspoon lemon extract
neon green food coloring (yellow and blue if you don't have green)

1. Sift powdered sugar into a bowl or onto parchment
2. Beat butter at medium-high speed until creamy
3. Add half of the sugar, turn mixer on low for 5 seconds.
4. Add the Mountain Dew, zest, and lemon extract . Beat until combined.
5. Add food coloring to the desired color.
6. Gradually add remaining sugar until you get to the consistency and sweetness you like.


Cappuccino Brownies

Tuesday, January 18, 2011

So today is my birthday=) I am now 18! Everyone likes to think of all the things they can do once they turn 18, and I'd have to say I'm most excited about the driving curfew being extended.

My birthday this year is pretty awesome. Last year was a mild birthday that I like to think was holding back in anticipation for this year. I have lots of plans. Yesterday mornin
g, my two friends and I went to First Watch for breakfast, which has amazing fresh options. I love it there. I had a parfait and an amazing muffin. If I could figure out the secret to their muffins, I'd... well I don't know really. But I would probably give my self the nickname "Muffin Goblin". Well no, I should pick something less ugly, like "Muffin Maiden". So after breakfast we walked over to the conveniently placed movie theater and saw "Black Swan". Natalie Portman is gorgeous, though I've always known this. It's twisted, creepy, scary; a definite thriller. Younger audiences advised.

Also, I got an early present over the weekend....


Ahhh! It's the Verizon Ally. It's the first smart phone in my family and I'm in love! We got a rebate on the phone so it ended up being free! And, the price of the data plan
was reduced too! It's sooo cool! I love all the apps and features and it's pretty much my best friend at the moment. The only thing that could make it better would be if I could easily blog from it and check blogs. I can access my blogger account, but scrolling through whats in my reader is difficult=/ I'll figure something out.


These brownies have nothing to do with my birthday, but I really enjoyed the
m. They were the first recipe I mad out of a new cookbook my friend got me for Christmas. The book is adorable and has large pictures on every page. However, it only contains straight recipes and no other personal touches. Also, It failed to mention an oven time for this recipe. I went with 350. This was a weird book with no author either. AND, the method they use to combine ingredients for this recipe is odd. Everything is thrown in one bowl and mixed. And it calls for an 11 x 7 baking pan? Who has that? Ok, I'm done ranting=)


As you might be able to see, it is quite sunken in the middle while the sides are puffy. Yeah, no one knows why it happened. But, since I wasn't giving any away, I didn't care how it looked because it tasted amazing. I made the glaze sug
gested, but had to improvise as we did not have nearly enough powdered sugar. With the glaze and a dusting of cocoa powder, these cappuccino brownies kept me going throughout the week! (Well, actually 3 days 'cause I ate them so fast!)


Cappuccino Brownies
from "what's cooking Baking"
makes: 15

Ingredients:
1 1/2 cups self rising flour (i made my own)
1 tsp baking powder
1 tsp unsweetened cocoa powder, and extra for dusting
1 cup butter, softened, and extra for greasing
1 cup superfine sugar
4 eggs beaten
3 tbsp instant coffee powder, dissolved in 2 tbsp hot water

white chocolate frosting:
4 oz white chocolate, broken into pieces
4 tbsp butter, softened
3 tbsp milk
1 3/4 cup confectioners' sugar

Directions:
Grease an 11 x 7 inch shallow cake pan and line the bottom with parchment paper.

Sift the flour, baking powder, and cocoa into a bowl and add the butter, sugar, eggs, and coffee. Beat well until smooth, then spoon into the prepared pan and smooth
top.

Bake in preheated oven (I did 350), for 35-40 mins, or until risen and firm. Let cool in pan for 10 minutes, then turn out onto a wire rack and peel off the paper lining. Let cool completely.

Frosting:
Place chocolate, butter, and milk in a microwave safe bowl and melt them together. Sift in confectioners' sugar. Beat until smooth, then spread over the cake. Dust the top of the cake with cocoa, then cut into squares.


Gingerbread Cakepops

Monday, January 17, 2011

Resolutions

1.) Bake more with and for friends and family: This has two parts to it, but they are quite similar. A lot of the baking I did this past year was for myself. Which, don't get me wrong, was great, but so much of my baking isn't seen or heard about by people I know. My mom, dad, and sister are all well aware, but I want it to go further. I was lucky enough to get to bake a few times this year with friends, but these times were few and far between. And moreover, (yes I just used the word moreover) I would like to share the frui
ts of my labors with friends and family! I usually never scale back recipes so I stick my family with the duty of eating all my creations. Sometimes it's a good thing, sometimes it can be difficult.

2.) Start making regular dinners for the family: Towards the end of
the year, regular family dinners had broken down within my family. It wasn't really a choice we made, but it just happened. With all of our busy schedules, it was hard to coordinate who would be home to eat it or when. So, this year I'm going to make sure we at least have three structured dinners a week. I want a reasonable and obtainable goal, so I think three will be good. Of course more can be made, but this is a minimum.

3.) Comment more on other people's blogs: I used to be very good about this. Then, when my own blogging became sparse, I stopped commenting. I still read SO MANY blogs daily, but I rarely comment. That's definitely not in the spirit of blogging. If I have enough time to read the post, why can't I just write a quick comment? I'm hoping to fix this ASAP.

4) Clean Daily: This is unrelated to blogging and can mean a number of things. I don't mean to do this in an OCD kind of way, but I like having a clean house or space. I usually end
up throwing my clothes all over my room and piles build up. Eventually, I will get to it and clean it, but I want to stop letting the piles turn into piles. Also, keeping our kitchen tidy since that's the center of our house pretty much. Small or big, cleaning is therapeutic and a good thing to do.

Now I could try and think of more resolutions, and I eventually will probably end up doing so, but I don't want to overwhelm myself. I think all
of these things will take up my time. This year is going to be big for me anyways as I will be mulling over my college options.


Now, for these little pops, I could say a lot. But I'm going to try to be brief. I've never made cake pops, but I've obvi seen them around. I read up a little bit on instructions, but most used cake box mixes and canned frosting, so they weren't very helpful. I guesstimated as heck of a lot. I think I might have put too much frosting beca
use it tasted very sweet to me. However, my mom thought it was just right.

I decided to dip them in plain white chocolate. This wasn't too bad, but eventually coating the balls was difficult. I luckily has skewers in my house to help me, but towards the end, my cake balls would slide down them=/ Overall, I'm no
t too sure I would make these again. It was a lot of time consuming work and I wasn't that wowed with the results. I would much rather just have a slice of cake. Plus, I have like 40 balls left over that are not coated because I had to stop because the process took forever!!

Gingerbread Cake

found at Lisa's Kitchen

2/3 cup of unsalted butter
3/4 cup of brown sugar
1/2 cup of honey
3/4 cup of molasses
2 teaspoons of fresh ginger, finely grated
1 teaspoon of ground cinnamon
1 cup of yogurt
2 large eggs
1 teaspoon of baking soda, dissolved in 2 tablespoons of warm water
2 1/3 cups + 2 tablespoons of unbleached white flour

Grease a 12 X 9 inch pan and then line with parchment paper.

In a medium sauce pan, melt the butter combined with the brown sugar, honey, molasses, ginger and cinnamon over medium heat, stirring often. In a small bowl, beat the eggs with a wire whisk and then add the yogurt and baking soda and water. Whisk a
few times and set aside.

When the butter is melted, remove the pot from the heat and stir in the yogurt and egg mixture.

Put the flour in a large bowl and add the liquid ingredients to the flour. Beat together until everything is well combined. Transfer to the prepared pan and bake in a 325 d
egree oven for roughly 45 minutes, or until the gingerbread rises and firms up. Nigella says to not overcook, as the gingerbread is especially nice when sticky and she also notes that it continues to bake a bit when removed from the oven. I tested it with a cake tester at the 45 minute point and it seemed just right.

Cake Pop Assembly:

After cake is cooled, crumble it to pieces in a large bowl. Dump in some frosting of your choice, but start small. You want the cake to come together but not be goopy.


Next, roll into 1 inch balls. Freeze the balls for 10 minutes to they are easier to work with when you go to dip them in the chocolate.


Melt some chocolate in a bowl in the microwave. Place the balls on skewers and dip them into the chocolate. Quickly, while the chocolate is still wet, roll the ball into sprinkles. Then, allow they pops to dry by placing the skewers into tall cups.


Tres Leches Cake

Wednesday, January 12, 2011

I made this cake for a recipe project for my Honors Spanish V class. We had to choose a traditional Spanish or Mexican dessert to bring in for the class. We needed to print out a copy in English, then translate it into Spanish. I have included both recipes in this post so you can see my amazing translating skills. I got a 100% on the project!


I must note that there are only 5 people in my Spanish
class. We have a really open environment and we are all very close. In fact, right now we are working on creating our own Spanish soap opera. It's extremely hilarious. Maybe when the final script is done I will share that with you as well. Anyways, we each brought in a dessert, and not to toot my own horn, but mine was by far the best. Aesthetically and taste wise.


There was marzipan, which was kind of odd since you
don't really just eat marzipan straight. Needless to say no one really ate it. There were apple dumplings, but it was cold, the mixture was watery, the tortilla was tough, and the skin was still on the apple. There was this odd 3 ingredient dessert scrambled egg things... no one knew what it was or touched it. And there would have been at least one other edible treat besides mine, if the girl hadn't burnt it. It was like orange french toast. She microwaved it, which helped greatly, but it was still charred=/


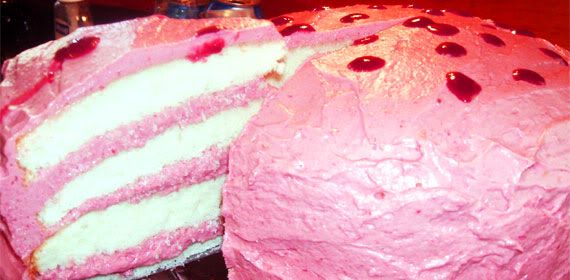
My cake, however, was loved. (This is a really conceded po
st. Yes, I am aware.) I knew I wanted to make it from the second our teacher told us our assignment. I had made it in cupcake form awhile back and loved it. I knew I had to make the full fledged cake. I basically carried it around with me all day at school and served up pieces to people. It would have been completely gone by the end of the day if I hadn't suddenly realized that I needed to save my mom a piece! I had just enough left for a fairly good sized piece. She had it and has declared it the BEST thing I have ever made. She constantly begs me to make it again. And you know what, it was so easy that I could!


Tres Leches Cake

from The Pioneer Woman, via Brown Eyed Baker

Yield: 12 servings

Prep Time: 40 minutes | Bake Time: 30 minutes | Inactive Time: 30 minutes

For the Cake:
1 cup all-purpose flour
1½ teaspoons baking powder
¼ teaspoon salt
5 eggs, separated
1 cup granulated sugar, divided
1 teaspoon vanilla extract
1/3 cup whole milk
1 can (12 ounces) evaporated milk
1 can (14 ounces) sweetened condensed milk
¼ cup heavy cream

For the Frosting:
2 cups heavy cream
3 tablespoons granulated sugar

1. Preheat oven to 350 degrees F. Grease and flour a 9×13-inch baking pan and set aside.

2. In a large bowl, whisk together the flour, baking powder and salt; set aside.

3. In the bowl of an electric mixer fitted with the whisk attachment, whisk the egg yolk and ¾ cup granulated sugar on medium-high speed until the mixture is thick and pale yellow. Add the whole milk and vanilla extract and mix to combine. Pour the egg yolk mixture over the flour mixture and, using a rubber spatula, gently fold together until thoroughly combined.

4. Clean out the bowl and the whisk. Add the egg whites to the bowl and whisk at high speed until soft peaks begin to form. With the mixer still running, pour in the remaining ¼ cup of granulated sugar and beat until the egg whites are stiff but not dry.

5. Working in three batches, gently fold the egg whites into the batter until just combined. Pour the batter into the prepared pan and smooth the surface with a spatula.

6. Bake for about 30 minutes, or until a toothpick inserted in the center comes out clean. Turn the cake onto a cooling rack and allow to cool completely.

7. Transfer the cake to a rimmed serving plate. Mix together the evaporated milk, condensed milk and heavy cream in a small pitcher. When the cake is cool, pierce the surface of the cake all over with a fork. Slowly drizzle all but 1 cup of the milk mixture over the top of the cake, making sure to get around the edges of the cake. (You can discard the remaining 1 cup of milk mixture.) Allow the cake to absorb the milk mixture for about 30 minutes.

8. To frost the cake, whip 2 cups of the heavy cream with 3 tablespoons of granulated sugar until thick and stiff peaks form. Spread over the surface of the cake. Garnish with maraschino cherries, if desired.

En Español:

Cantidad: 12 trozos

Preparación tiempo: 40 minutos

Cocer al horno tiempo: 30 minutos

Descanso tiempo: 30 minutos

Para la torta:

1 taza de harina

1 ½ cucharaditas de polvo de hornear

¼ cucharadita de sal

5 huevos, separados

1 taza de azúcar, dividido

1 cucharadita de extracto de vainilla

1/3 taza de leche entero

1 lata de leche evaporada (12 onzas)

1 lata de endulzo leche condensada (14 onzas)

¼ taza de nata para montar

Para el glaseado:

2 tazas de nata para montar

3 cucharadas de azúcar

Direcciones:

1) Precaliente el horno a 350 grados de Fahrenheit. Engrase y harina de la 9 x 13 molde y lo reserve.

2) En un tazón grande, bata junto la harina, el polvo de hornear, y la sal; lo reserve.

3) En el tazón de una batidora eléctrico encajó con un batir accesorio, bata las yemas de los huevos y ¾ taza de azúcar a la medio-alta velocidad hasta la mezcla es gruesa y amarilla clara. Agregue la leche entero y extracto de vainilla y se mezcle combinar. Vierta las yemas encima de la harina mezcla y usando una espátula de goma, doble junto con cuidado hasta combinado a fondo.

4) Limpie el tazón y batir. Agregue las claras de huevos al tazón y bata a alta velocidad hasta picos suaves forma. Con la batidora funcionamiento, vierta en la restante ¼ taza de azúcar y bata hasta las claras de huevos son rígida pero no secas.

5) Funcionando en tres lotes, doble con cuidado las claras de huevos en la mezcla hasta apenas combinado. Vienta la mezcla en la molde preparada y alise la superficie con una espátula.

6) Hornee por 30 minutos, o hasta un palillo de diente en el centro vuelve limpiado. Invierta la torta sobre escurre plato para refrescar.

7) Traslade la torta a un plato para servir. Mezcle la leche evaporada, la endulzo leche condensada, y la nata para montar en un pequeño cántaro. Cuando la torta es fresca, perfore la superficie de la torta por toda con un tenedor. Despacio llovizne todo pero 1 taza de la leche mezcla encima de la superficie de la torta, asegúrate de que lo haces por aní los bordes de la torta. (Tú puedes desechas la restante 1 taza de la leche mezcla.) Permita la torta absorber la leche mezcla por más o menos 30 minutos.

8) Glasear la torta, bata 2 tazas de nata para montar con 3 cucharadas de azúcar hasta gruesa y rígida picas forman. Unte sobre la superficie de la torta. Guarnecía con cerezas, si deseado.